Yearly Archives: 2014

6 posts

HTTP and images in Windows Phone

I continue to explore different techniques of displaying images in Windows Phone and this time I will show some possible implementations of fetching them from the web using the HTTP protocol.

Classic implementation:

public static void GethttpImage1(string urlImage, Action<BitmapImage> action)  
{
  var request = (HttpWebRequest)WebRequest.Create(urlImage);
  request.BeginGetResponse(result =>
  {
    using (var sr = request.EndGetResponse(result))
    {
        Deployment.Current.Dispatcher.BeginInvoke(() =>
            {
                var image = new BitmapImage();
                image.SetSource(sr.GetResponseStream());
                if (action != null)
                    action(image);
                sr.Close();
            });
    }
  }
}

urlImage is a string representation of the url of the image : example : http://dev.bratched.fr/download/testimage1.png

This method uses the WebRequest class and reads the response as a Stream using request.EndGetResponse.

The

Deployment.Current.Dispatcher.BeginInvoke(() =>

call is very important as it allows us to use the BitmapImage on the main UI thread even when the callback is invoked on a background thread.

The method will invoke the action and pass the retrieved image to this action as parameter.

It can be invoked like this in order to set a property of type BitmapImage:

HttpImageService.GethttpImage1("http://dev.bratched.fr/download/testimage1.png", b =>
    {
       Image = b;
    });

Implementation with async/await:

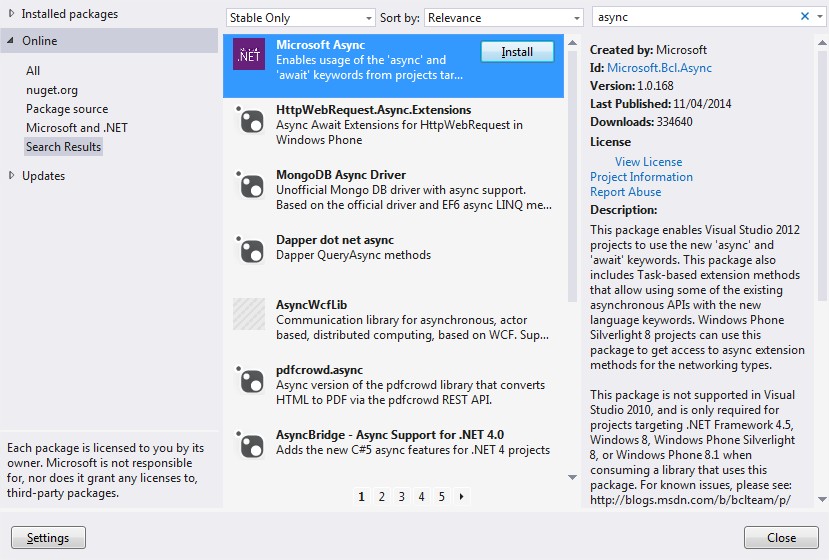
The “Microsoft Async” allows to use the async/await pattern in the standard Windows Phone methods.

NuGetPackagesAsync

This package adds some extension methods to the standard WebRequest class returning Task<BitmapImage>

using (WebResponse response = await request.GetResponseAsync())


Replaces the following elements:

request.BeginGetResponse(result =>
  {
    using (var sr = request.EndGetResponse(result))
    {

The function returns directly a Task<BitmapImage> instead of passing an action as parameter

public static async Task<BitmapImage> GethttpImage2(string urlImage)
{
    try
    {
        var request = (HttpWebRequest)WebRequest.Create(urlImage);
        using (WebResponse response = await request.GetResponseAsync())
        {
            BitmapImage image = null;
            DispatcherSynchronizationContext dsc = new DispatcherSynchronizationContext(Deployment.Current.Dispatcher);
            await Task.Factory.StartNew(() =>
            {
                dsc.Send(_ =>
                {
                    image = new BitmapImage();
                    image.SetSource(response.GetResponseStream());
                }, null);
            });
            return image;
        }
    }
    catch (Exception)
    {
        return null;
    }
}

Remark :

DispatcherSynchronizationContext dsc = new DispatcherSynchronizationContext(Deployment.Current.Dispatcher);
            await Task.Factory.StartNew(() =>
            {
                dsc.Send(_ =>
                {

replaces

Deployment.Current.Dispatcher.BeginInvoke(() =>

Here we still need to marshal the call on the main Thread to allow using the returned BitmapImage and bind it on the UI.

The async/await pattern illustrated here allows better management of the threads as it relies on the TPL. Vous pouvez la remplacer sans soucis par l’ancien code.

Here’s how you could call the function: (Image is a property of type BitmapImage)

Image = await HttpImageService.GethttpImage2("http://dev.bratched.fr/download/testimage1.png");

HttpClient

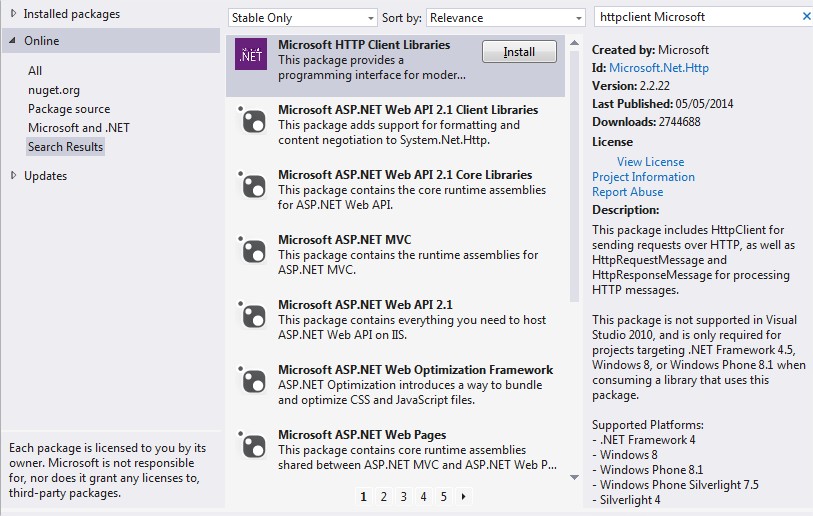
The “Microsoft HTTP Client Libraries” NuGet needs to be installed in order to be able to use the HttpClient class. The advantage of this class is that it allows to use the same syntax as we would in a Windows 8 application.

NuGetPackageshttpClient

Important remark: it’s necessary to use a buffer instead of a Stream because

  • BitmapImage needs to be used on the main Thread
  • The Main thread cannot be used in AsyncStream


public static async Task<BitmapImage> GethttpImage3(string urlImage)
{
    try
    {

        HttpClient httpClient = new HttpClient() { MaxResponseContentBufferSize = 100000000 };
        var ImageData = await httpClient.GetByteArrayAsync(urlImage);
        {
            using (var s = new MemoryStream(ImageData))
            {
                BitmapImage image = null;
                DispatcherSynchronizationContext dsc = new DispatcherSynchronizationContext(Deployment.Current.Dispatcher);
                await Task.Factory.StartNew(() =>
                {
                    dsc.Send(_ =>
                    {
                        image = new BitmapImage();
                        image.SetSource(s);
                    }, null);
                });
                return image;
            }
        }
    }
    catch
    {
        return null;
    }
}

This function can be called the same way as before:

Image = await HttpImageService.GethttpImage3("http://dev.bratched.fr/download/testimage1.png");

Performance tests

The 3 methods can be used but which one performs better when loading multiple images?

I have adapted the previous program from Performance tests of static images to

  • Display the 3 methods in the lists
  • Benchmark by loading 10 times the big png image (400K 1000×1000) from the previous article

I have also added the MemoryCounter from Coding4Fun to follow the memory usage.

Here are the results from a WiFi network (average from 20 passes).

  • Method 1 : HttpRequest/Response with Action callback : 6 sec
  • Method 2 : Async HttpRequest/Response : 9 sec
  • Method 3 : HttpClient : 8,5 sec


During the tests I have also inverted the order of passes to avoid influencing the results.

La consultation des listes donne un réel aperçu des 3 différentes méthodes.

C’est encore une fois la méthode “classique” avec HttpRequest qui donne le meilleur résultat.

Le système d’Action permet d’éviter l’attente de la fin du traitement du thread pour interroger le réseau et permet ainsi une meilleure parallélisassions des tâches.
Utilisation des Images resources avec Windows Phone

Je vous propose un petit retour d’expérience sur l’utilisation des ressources dans le développement Windows Phone dans un modèle M-V-VM.

Différentes façon de coder

L’image que l’on souhaite afficher provient des ressources et devrait pouvoir s’afficher à travers une propriété Image de type BitmapImage dans un ViewModel. A noter que le dans l’exemple ci dessous, UIThreadPool permet d’afficher cette image même lorsque celle-ci est alimentée depuis un Thread qui tourne en tâche de fond.

SynchronizationContext UIThread = SynchronizationContext.Current;

public BitmapImage Image
       {
           get { return _image; }
           set
           {
               UIThread.Post(_ =>
                   {
                       _image = value;
                       RaisePropertyChanged("Image");
                   }, null);
           }
       }

Comment afficher une image incluse dans les ressources de l’application ?

Attention les 2 premières méthodes décrites sont à proscrire et à ne surtout pas reproduire. Allez jusqu’à la fin de l’article pour voir comment implémenter correctement l’affichage d’une image ressource.

Méthode Stream

Lorsque l’on est habitué à récupérer une image d’un flux http ou même de l’isolated Storage on peut être tenté d’uniformiser le code et d’implémenter un Stream pour récupérer l’image stockée dans une application :

public static void LoadResourceImage2(string resourceName, Action<BitmapImage> action)
        {
            var resource = Application.GetResourceStream(new Uri(resourceName, UriKind.Relative));
            {
                if (resource != null)
                {
                    Stream stream = resource.Stream;
                    {
                        if (stream != null)
                        {
                            Deployment.Current.Dispatcher.BeginInvoke(() =>
                            {
                                StreamToBitmapAction(action, stream);
                                stream.Dispose();
                                stream = null;
                            });
                        }
                        else
                            throw new NullReferenceException();
                    }
                };
            }
        }

L’affichage de l’image est retournée par une méthode générique qui prend un Stream en entrée et retourne un BitmapImage en asynchrone dans une Action.

private static void StreamToBitmapAction(Action<BitmapImage> actionBitmap, Stream stream)
        {
            BitmapImage bitmapImage = new BitmapImage();
            bitmapImage.CreateOptions = BitmapCreateOptions.None; 
            bitmapImage.SetSource(stream);
            stream.Dispose();
            if (actionBitmap != null)
                actionBitmap(bitmapImage);

L’utilisation de ce Stream peut ensuite se faire de la façon suivante :

CacheImageService.LoadResourceImage2(resourceName, b => Image = b ) ;

Méthode async et await

Nous pouvons également utiliser async/Await pour rendre le code plus compréhensible et éviter ce meli-mélo d’actions imbriquées. A noter que le code peut également fonctionner avec Windows Phone 7 si vous ajoutez le paquet nuget Mycrosoft Async et que vous utilisez à minima Visual Studio 2012 (donc avec Windows 8). (Remarque : La version Visual Studio 2010 avec WP7 et le paquet Nuget Async semble fonctionner. Cependant l’application se comportement de façon aléatoire avec le async/await donc je vous recommande d’éviter, sauf à vouloir chercher durant des heures pourquoi votre application n’exécute pas à chaque fois le code async/await). La version Visual Studio 2012 et WP7 fonctionne très bien en revanche. Voici donc un exemple d’implémentation possible avec le async await.

public static async Task<BitmapImage> LoadResourceImage1(string resourceName)
        {
            using (var imageStream = await LoadStreamResourceAsync(resourceName))
            {
                return await InitBitmapImageAsync(imageStream);

            }
            return null;
        }

        public static async Task<Stream> LoadStreamResourceAsync(string resourceName)
        {

            return await Task.Factory.StartNew<Stream>(() =>
            {
                if (resourceName == null)
                {
                    throw new ArgumentException("Ressource Name is null");
                }
                Stream stream = null;
                var resource = Application.GetResourceStream(new Uri(resourceName, UriKind.Relative));
                {
                    if (resource != null)
                        stream = resource.Stream;
                }
                return stream;
            }, CancellationToken.None, TaskCreationOptions.AttachedToParent, TaskScheduler.Default);
        }

        private static async Task<BitmapImage> InitBitmapImageAsync(Stream imageStream)
        {
            BitmapImage image = null;
            DispatcherSynchronizationContext dsc = new DispatcherSynchronizationContext(Deployment.Current.Dispatcher);
            await Task.Factory.StartNew(() =>
            {
                dsc.Send(_ =>
                {
                    if (imageStream != null)
                    {
                        image = new BitmapImage();
                        image.CreateOptions = BitmapCreateOptions.None;
                        image.SetSource(imageStream);
                    }
                }, null);
            });
            return image;
        }

Méthode new BitmapImage

Enfin, la dernière méthode est déconcertante de simplicité :

 public static void LoadResourceImage3(string resourceName, Action<BitmapImage> action)
        {
        Uri uri = new Uri(resourceName, UriKind.RelativeOrAbsolute);
        Deployment.Current.Dispatcher.BeginInvoke(() =>
            {
                if (action != null)
                    action(new BitmapImage(uri));
            });            
        }

Difficile de faire plus simple Non ? Remarque : le “Deployment.Current.Dispatcher.BeginInvoke” est très important ici pour pouvoir utiliser cette méthode dans un Thread en arrière plan : new BitmapImage nécessite en effet le Thread principal de l’interface utilisateur (le ThreadUI) pour s’exécuter (l’instruction …Dispatcher… est là pour indiquer que l’exécution se fait dans le Thread principal).

Tests de performance

Capture Benchmark affichage ressource Image Pour savoir laquelle de ces 3 méthodes est la plus rapide, j’ai réalisé un petite application Benchmark qui charge 100 images avec la répartition suivante :

  • 50 images png petites (300×300 pour 25ko)
  • 50 images png grandes (1000×1000 pour 437ko)

Voici les résultats moyens observés sur un Nokia Lumia 920

  • Méthode Stream avec async await : 5 secondes !
  • Méthode Stream avec Action : 3,5 secondes
  • Méthode new BitmapImage : 0,435 secondes ! (10 x plus rapide)

Cette petite application permet également de tester en réel les images dans des listes de 100 éléments et ainsi d’apprécier l’expérience utilisateur. La dernière implémentation: “new BitmapImage(uri)”, la plus simple, est à privilégier pour charger des ressources images car elle offre des performances sans équivalent.

Content ou resource ?

On retrouve pas mal d’articles sur le stockage des ressources sous forme content ou resource. Tous les articles que j’ai pu rencontrer recommandent de privilégier le stockage de type « content » à celui de type « resource » dans nos Apps.

Ressources “Content”

Visual Studio Ressources Content Les images stockées avec une “Build Action” = content sont simplement ajoutées au fichier xap de votre application, et de ce fait, ne sont pas stockées dans la dll. Ces images sont accessibles directement par une syntaxe de cette forme à travers une Uri : « Assets/Testimage.png » (où Assets représente le répertoire où elles sont stockées).

Ressources “Resource”

Visual Studio Ressource Resource Les images avec un “Build Action” = Resource sont stockées directement dans la dll. Pour les utiliser, il faudra indiquer le chemin complet de cette dll de la façon suivante : “SampleCacheImageApp;component/Assets/Testimage2_res.png” (où SampleCacheImageApp représente le nom de l’application et /Assets le répertoire) La resource étant contenue dans la dll, il est alors normal que le chargement au démarrage de la dll prenne un tout petit peu plus de temps.

Tests de performance

Les tests de performances sont assez troublants. Une première phase de tests a été réalisée avec l’émulateur qui a nettement favorisé le stockage “Content”. Mais sur un vrai téléphone, les résultats sont totalement différents :

  • Rappel : Méthode new BitmapImage avec les images en » content » : 0,435 secondes !
  • Méthode new BitmapImage avec image en « resource » : 0,049 secondes !!!, soit presque 10x plus rapide.

Benchmark ressources buildaction content vs resource Alors faut-il systématiquement utiliser des ressources en “Build Action = content ” ? Personnellement, je viens de passer toutes mes ressources en “Action Build = Resource” pour toutes les listes nécessitant des centaines de chargements… Si quelqu’un peut me donner une explication à cette différence entre émulateur et matériel? Ce chiffre est-il constaté sur vos téléphones ? Ai-je commis une erreur dans l’écriture des tests ? Est-ce lié au nombre d’applications installées ? Le code source de l’application des tests benchmark se trouvent à cet emplacement : download-10-icon-256

Sharing of source code in Windows and Windows Phone projects

The Portable Class Library (PCL)

The portable Class library (PCL) will allow us to share a large part of the code across projects.

It is possible for a few years to share the PCL code between projects (Sliverlight and WPF, Windows Phone, Windows 8,…).
More projects are different, the more shared classes decreases.

It is important to see that this Library can be used for projects compatible with the selected options.

Note also the visual studio Express editions do not create a PCL, but instead accepts their use in a project.

This Library may use a library which would not have at least the same options selected.

PCL_WindowsMenu

Continue reading

Slow HTTP requests in .NET

When profiling a web application I have noticed constant delays of about 200ms on some HTTP calls it was making to an external API. Both the web application and the API were on the same network segment and thus network latency was out of the question. Besides the target API has previously been subject to jMeter load tests and proven to handle 1500req/s. What was even more peculiar in this situation was that only the POST requests were exhibiting this delay. GET requests were pretty fast as expected.

Continue reading

Visual Studio versions for your Windows Phone Apps?

Windows Phone 7.x, 8.0 and 8.1

3 major versions of Windows Phone exist since April: 7.x, 8 and 8.1.

The 8.1 version allows among others to create ‘classic’ Windows Phone 8.1 applications called 8.1 – Silverlight (SL) and also Universal applications that can be shared between Windows 8.1 and Windows Phone 8.1.

Having common codebase was already partially possible with the PCL (Portable Class Libraries). The compiled assembly can be used in Windows Phone 7.x, WP8 and Windows 8 project for example.

With Universals Apps the UI code can also be shared.

Visual Studio 2013 allows for creating PCL compatible with WP8, W8, WP8.1, W8.1 which can be used in classic Windows Phone applications and Windows 8.x with Universal Apps projects.

But Visual Studio 2013 is no longer compatible with WP7.x.

Windows Phone 7.x still represents 19% of Windows Phone users in April 2014 (click on the image for the full survey of adduplex).

clip_image003_thumb

So you need to make a choice.

If you want to create an application for Windows Phone 7.x you need to use Visual Studio 2012. The PCL will be compatible WP7 and WP8, as well as the Windows Phone 7.x application.

Summary

The diagram below shows the possibilities of each Visual Studio version.

Depending on how the PCLwas built, your code may or may not be shared between a Windows Phone 7 project and a Windows Phone 8.1 project.

Continue reading

Creating multilingual websites in WordPress

The purpose of this post is to show a tutorial about creating a multilingual website in WordPress using the multisite feature.

Advantages of the proposed solution :

  • Lots of flexibility for content translation and presentation of the articles in different languages
  • Different themes based on country
  • Search Engine Optimization

Step 1 : Creating multisite WordPress

Add the following line in wp-config.php.

define ('WP_ALLOW_MULTISITE', true);

This will activate a new option in the Dashboard: Tools -> Network Setup.

All that’s left is to follow the instructions.

Choose the default folder options in order to have urls of the following pattern www.monsite.com/fr/mapage.html

2 actions are necessary :

  • Copy/Paste some code inside wp-config.php
  • Copy/Paste some code inside .htaccess

Continue reading